
Table of Contents
The front of a Double G buckle is the obvious place to start looking at a Gucci belt. I find the relationship behind it more revealing: how the buckle attaches, how the stud meets the strap, where the holes show wear, and whether the stamped size agrees with the usable length.
A belt is a small assembly with a working history. An extra hole, replaced fitting or shortened strap can change the evidence substantially. My reading order is identify the version, inspect the fastening, compare the leather, read the stamp, then check size and alterations. That keeps a recognizable logo in proportion to the rest of the object.
The close-up images in this guide come from the original Gucci technical reference material I compiled for this series, rather than retail product pages collected to illustrate a generic checklist. I use each image within the belt construction it actually shows.
Confirm the Closure Type Before Inspecting It
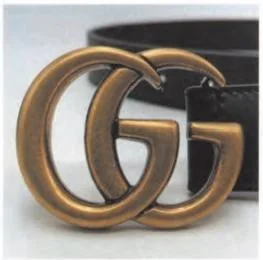
This guide’s buckle images show a Double G stud fastening. A frame buckle with a moving prong and a reversible mechanism work differently, so their screws, attachment points and wear zones should not be transferred to this example.
For the belt in front of me, I first match the closure, strap material, width and style reference. That brief classification is enough to choose the right mechanical comparison; a full catalogue of Gucci buckle designs belongs outside this guide.
Read the Buckle from Front to Attachment
On the Double G example above, begin with the curves, terminal shapes and negative spaces. Follow each letter’s outline, then compare how the two bodies sit together. This is more useful than deciding whether the buckle simply looks thick, heavy or shiny.
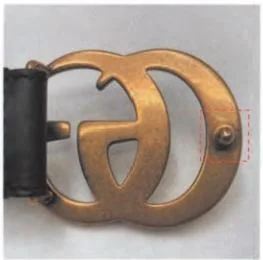
Turn to the reverse and separate the fasteners by function. A stud that enters a strap hole does a different job from a fitting that secures the buckle to the leather. A visible round head is worth identifying before counting screws or comparing its finish.
A PurseForum buyer’s question lists the numbers, width and several screws on a buckle. It illustrates why isolated details need a model reference: count, location and purpose have to be read together. I would want to understand the complete attachment before giving a screw count any weight.
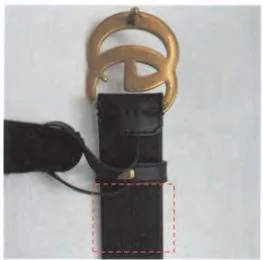
The folded leather in the third image supplies that context. Follow the stitching around the fold, the strap’s alignment and the keeper’s position. An unexplained extra puncture, cut edge or disturbed stitch line is a reason to ask about work on the belt. A consistent attachment makes the hardware comparison much more informative.
The fastening stud: head, neck and base
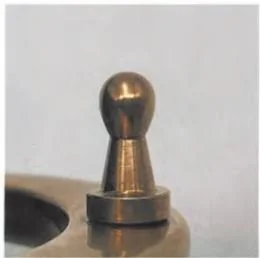
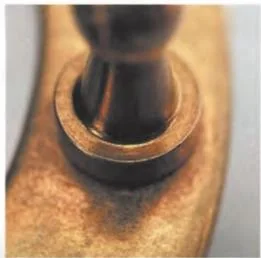
The head, neck and base form a useful three-part comparison. In this example, the head is rounded rather than a flat-ended cylinder, the neck narrows underneath it, and the base forms a distinct wider ring. Compare those proportions from equivalent angles; a steep view can hide the neck almost completely.
The circular lines at the base add a surface detail to the shape comparison. I use them only with a closely matched fitting. A buyer comparing “brass” and “antique brass” Double G belts illustrates why the stated finish should be matched before comparing images. For plating, oxidation, engraving and general wear, use my Gucci hardware and zippers guide.
Inspect the Holes as Finished, Working Edges
Look inside a hole as well as around it. On a comparable finished leather strap, inspect the rim, exposed inner wall, edge color and transition to the surface. The useful question is whether the holes were finished consistently with the rest of that strap.
A hole used repeatedly can become elongated or polished along its contact edge. Compare it with less-used holes on the same belt. If one opening has a rougher wall, different diameter or off-center position, consider whether it was added later. This within-belt comparison helps separate wear and alteration from a broader construction problem.
Gucci’s official belt size guide explicitly recognizes both three-hole and five-hole arrangements. Hole count belongs to version identification; it is not an automatic authenticity test.
In a buyer discussion about adding holes to a Marmont belt, owners describe alterations for different waist positions. Their accounts are a useful reminder to ask about fit changes when buying used. An extra hole should be disclosed and assessed for finish, placement and nearby cracking.
For a proposed alteration, Gucci directs customers to inquire with a store; its care service begins with an item assessment. Ask about your exact belt before assuming the work, cost or turnaround is standard.
Compare the Embossed GG Pattern Across Several Repeats
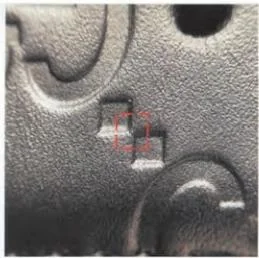
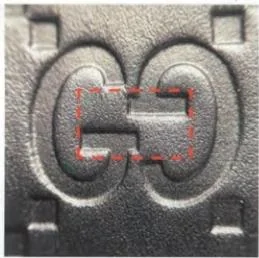
In these embossed-leather examples, separation matters: the GG outlines and nearby small geometric forms remain distinguishable. Trace the gaps as carefully as the raised or recessed shapes. Look for the same relationships in several neighboring units.
I compare two things separately: the geometry of an individual unit and the rhythm of the repeat across the strap. A belt can have a plausible-looking pair of Gs but an awkward repeating layout. Conversely, wear in one bend can soften an otherwise consistent pattern.
Use a relatively flat, less-worn area for the first comparison, then follow the pattern through the bending zone. A local flattened impression and a repeatedly joined outline are different findings. Keep this test specific to the embossed design shown; printed GG Supreme canvas has a different surface and pattern execution.
Read the Leather Stamp in Two Passes
First read the stamp as a complete impression: location, line arrangement, wordmark proportions, spacing and how the impression meets the leather grain. Then transcribe the characters. Working in that order makes it harder for a familiar number to distract from an inconsistent physical stamp.
For the GUCCI wordmark itself, use the G, U, C and I comparisons in my Gucci serial numbers and leather tags guide. Here the focus is the belt’s numerical impressions and their relationship to its size and construction.
A faint impression needs a clearer view before its letter shape can be read. I compare characters that are substantially intact, and look for consistent proportions across the sequence. A small section disappearing into coarse grain is less informative than a clearly resolved shape that repeatedly differs from the matched reference.
Belt-number geometry: 0, 4, 5, 6, 7 and 9
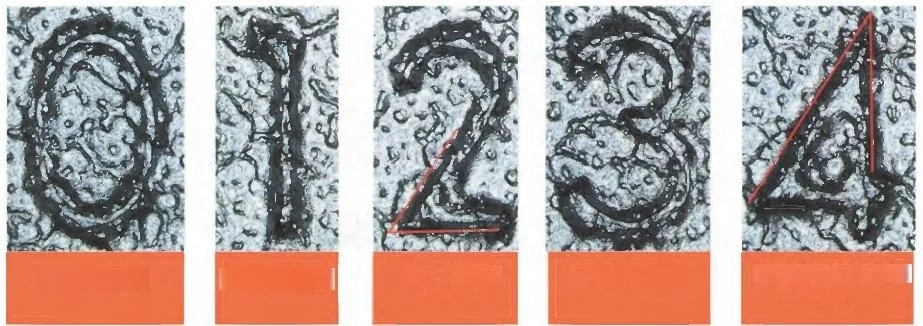
The reference zero is oval, and the 4 has a pointed upper junction with a long diagonal. Those are easy entry points. The more useful follow-up is proportional: compare the upper and lower parts of 5, and the short terminal against the larger loop in 6 and 9.
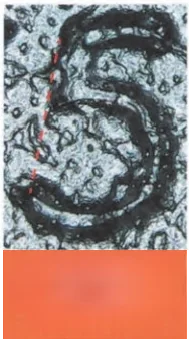 | 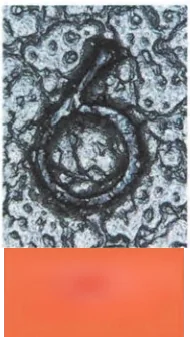 | 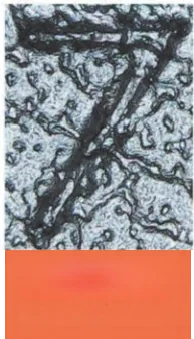 | 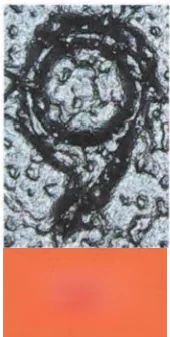 |
| 5: compare the short upper section and larger lower body. | 6: read the leading stroke against the lower loop. | 7: follow the top bar and steep descending stroke. | 9: compare the rounded head and short terminal. |
On smaller screens, swipe horizontally to see all columns.
| Digit | Visible reference feature | How I compare it |
|---|---|---|
| 0 | Oval body | Compare height, width and the inner opening |
| 2 / 4 | Defined lower turn on 2; pointed top and long diagonal on 4 | Trace the stroke path rather than overall darkness |
| 5 | Short upper portion, larger lower body; marked upper stroke projects toward the lower terminal | Compare the two portions and their alignment |
| 6 / 9 | Short terminal relative to the larger loop | Judge terminal-to-loop proportion within each digit |
| 7 | Top bar meeting a strongly sloping downstroke | Compare the bar/diagonal relationship and open triangular area |
These images illustrate one belt-stamping reference family. I use the geometry as a comparison vocabulary, with the exact version supplying the standard. The small crops remain near native display size so the visible stroke relationships stay honest.
Use Sizing to Cross-Check the Numbers
Separate product-identifying characters from a size pair. A marking such as 75 / 30 is consistent with a centimeter/inch sizing context: 75 cm is approximately 29.5 inches. Read the full arrangement before deciding which digits belong to the size.
Gucci’s measurement instructions distinguish the starting point: for Double G styles, use the outside edge of the buckle; for standard buckles, use the beginning of the strap. Both instructions refer to the third hole. Record that measurement separately from the belt’s total end-to-end length.
This creates an independent check on the stamp. If the usable measurement is substantially different from the marked size, first recheck the buckle type and starting point. Then investigate whether the strap was shortened or the fastening changed. An added hole changes fit options; cutting the strap can change the length relationship itself.
For a style-number search, compare the returned buckle, width, material and color with the belt. I find a coherent physical configuration and sensible length relationship more useful than a screenshot matching only the digits.
Separate Authenticity, Alteration and Wear Before Buying
My final assessment has three parts: confidence in the identified belt, work performed after manufacture, and present condition. A belt can be convincing in origin yet poorly altered or unsuitable for the fit I need. Those are different purchase decisions.On smaller screens, swipe horizontally to see all columns.
| Finding | Interpretation to investigate | My next step |
|---|---|---|
| One extra hole, otherwise consistent construction | Fit alteration | Ask when it was added; inspect its rim and surrounding leather |
| Marked size and usable length disagree | Measurement error or shortening | Remeasure from the correct origin, then ask about alteration history |
| Fresh-looking buckle with disturbed attachment | Possible component work | Request repair details and compare the attachment with the correct version |
| Soft print only at a heavily bent area | Local wear | Compare intact characters and inspect the bend for structural damage |
| Several clear conflicts in buckle, embossing and stamp | Broader construction inconsistency | Pause the purchase and obtain a complete assessment |
Frequently Asked Questions
Do authentic Gucci belts always have five holes?
No. Gucci’s size guide describes both three-hole and five-hole belts. Match the original arrangement to the exact version.
Does a screw on the buckle mean a Gucci belt is fake?
Identify what the fitting does and compare the same buckle construction. Screw count alone is a weak shortcut.
What do the size numbers on a Gucci belt mean?
A size pair can express centimeters and approximate inches. Cross-check the marking with Gucci’s measurement method for that buckle type.
Can I authenticate a Gucci belt by serial number?
A number helps identify a comparison. The stamp, buckle, strap and measured configuration still need to agree.
Is an extra hole a sign of a counterfeit belt?
It may be a fit alteration. Ask about its history and inspect the opening for poor finishing or damage.
Which stamped digits are most useful to compare?
Start with 0, 4 and 5, then compare the terminal-to-loop proportions of 6 and 9 against a matched belt reference.
What Would Make Me Comfortable Buying the Belt?
I want a recognizable version, coherent buckle and leather construction, readable stamp details, and a size that makes physical sense. I also want alterations described plainly. That combination gives me a stronger basis for buying a pre-owned Gucci belt than any isolated logo or code.
If one area remains unclear, resolve that specific question. If several well-observed details conflict, pause. And if the construction looks consistent but the strap is split, the stud is loose or the fit is wrong, condition alone may be enough for me to pass.